• Skip to primary navigation
  • Skip to main content
  • Skip to primary sidebar
Trending: Healthy New Year
  • About
  • Shop
  • Work with Me
  • Contact

Cooking for Keeps

  • All Recipes
  • Course
    • Appetizers
    • Bread
    • Breakfast
    • Casseroles
    • Cocktails
    • Dips
    • Main Course
    • Pasta
    • Salads
    • Sandwiches
    • Sauces
    • Side Dishes
    • Soups & Stews
    • Stir Fries
    • Sweets
  • Protein
    • Beef/Lamb
    • Chicken/Poultry
    • Pork
    • Seafood
    • Vegetarian
  • Method
    • Casseroles
    • Slow-Cooker
    • Grilling
    • Minimal Ingredients
    • Quick
    • Air Fryer/Instant Pot
    • Oven
    • No cook
    • Stovetop
    • Kid Friendly
    • Dinner Party Worthy
    • One Pan
Home easy
Easy easy

Valentine’s Day Gift Card and Candy Bar Bouquet

By: Nicole 5 Comments
Posted: 02/05/16 Updated: 02/06/16

This post may contain affiliate links. Please read my disclosure policy.

s3.amazonaws.com-photography.prod.demandstudios.com-e3061e6a-4ff0-4592-94eb-6cfb1b8e1b28

Hey guys! I have something a little different for you today. I’ve partnered up with Kroger to bring you guys a fun DIY candy bar bouquet to give to your loved one this Valentine’s Day! Almost everyone on your gift list (especially my candy-loving husband) will love this bouquet filled with different types of candy and Gift Cards. Follow these step-by-step instructions for a super-easy, pretty way to present your bouquet for Valentine’s Day!

What you’ll need:

• 4 medium- to large-sized candy bars
• 3-4 mini candy bars
• 2-3 Gift Cards
• 1 Mason jar
• Candy to fill the jar
• 1 small floral foam ball
• Red or white tissue paper
• Lollipop sticks
• Cellophane tape
• Pretty ribbon
• Scissors

s3.amazonaws.com-photography.prod.demandstudios.com-f1518358-be66-4857-a5de-b77b7f8c5cbd

Directions:
1. Cut the foam to fit inside the top of the Mason jar and wrap the foam with tissue paper.
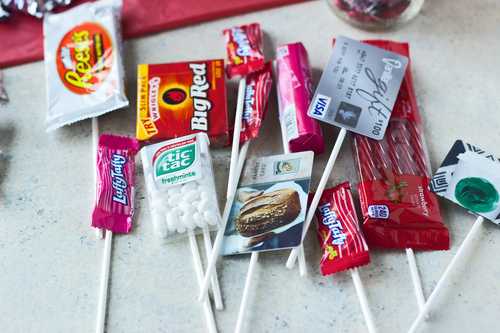
2. Use tape to secure sticks to the backs of the candy bars and Gift Cards.

s3.amazonaws.com-photography.prod.demandstudios.com-3e06fc48-f57b-4a40-b5c8-7a70608547a0

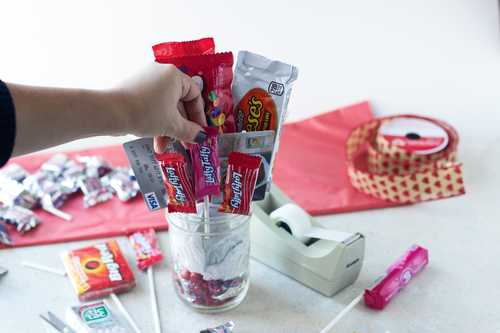
3. Fill the Mason jar halfway with candy and place tissue-wrapped foam on top of the candy so that it lines up with the top of the jar.
4. Starting from the back, poke the sticks through the foam to secure them. For the smaller candy bars and gift cards, you’ll probably have to cut the sticks so each layer is a little bit shorter than the last – you want to be able to see all the candy and stagger each layer.

s3.amazonaws.com-photography.prod.demandstudios.com-9c681d97-2041-48f1-ab30-04e539137c4e

5. Tie with pretty ribbon and make a fancy bow so the majority of the ribbon covers the sticks, tissue paper and foam ball.

s3.amazonaws.com-photography.prod.demandstudios.com-cbe62cfe-df39-4748-83cd-316f55b6e597

How To Make A Candy Bar Bouquet

This content was created in partnership with Kroger Family Stores using free products provided by Kroger.

Meet Nicole

Welcome! My lifelong passion for delicious food and cooking has evolved over time into an equal love of showing you an elevated meal can be easy, approachable and most importantly, tasty. Dive in and find something perfect for you and your family!

Read more...

You May Also Like...

  • Giveaway logo
    Birthdays and Amazon Gift Card Giveaway
  • Chopped Tuscan Salad (Made from the Salad Bar!)

Never miss a recipe!

Loading

Reader Interactions

Leave a Comment Cancel reply

Have a question? Submit your question or comment below.

Recipe Rating


This site uses Akismet to reduce spam. Learn how your comment data is processed.

  1. Taylor @ Food Faith Fitness says

    Posted on 2/5/16 at 11:29 am

    Okay I think this is such a cute idea and gift! Such an easy way to make it special for someone as well by picking what treats they like best. LOVE IT!

    Reply
  2. Karen @ The Food Charlatan says

    Posted on 2/5/16 at 11:28 pm

    This is super cute Nicole! I especially love the stick with the card on it 🙂

    Reply
    • Nicole says

      Posted on 2/9/16 at 12:01 am

      Thanks Karen!

      Reply
  3. Summer says

    Posted on 2/7/16 at 1:29 pm

    I need to try making my own bouquet! This is so cute ♥

    summerdaisy.net

    Reply
    • Nicole says

      Posted on 2/8/16 at 11:59 pm

      Thanks Summer!

      Reply

Primary Sidebar

hey

Meet Nicole

Welcome! My lifelong passion for delicious food and cooking has evolved into an equal love of showing you easy elevated meals can be approachable and most importantly, tasty.

Read More

Browse by Difficulty

Easy easy Medium medium Advanced hard

Reader Favorites

Best Chicken Enchilada

Best Chicken Enchilada Recipe

Italian Stromboli

Italian Stromboli (5 Ingredients!)

French Onion Chicken Skillet

French Onion Chicken Skillet

One Pot Mexican Past

One Pot Turkey Mexican Pasta

Subscribe to latest recipe updates

Loading

Trending

Coconut Curry Meatballs

Coconut Curry Meatballs

Bulgogi Beef Lettuce Wraps

Bulgogi Beef Lettuce Wraps

Creamy Chicken Tortilla Soup

Creamy Chicken Tortilla Soup

Spinach and Ground Beef Stuffed Shells

Stuffed Pasta Shells with Ground Beef and Spinach

meet nicole

Cooking for Keeps Cooking for Keeps
I'm Nicole. A born and bred food lover, cook since age seven and girl behind all the recipes and photographs you see here. Welcome!

subscribe

bloglovin feedly

popular posts

[tptn_list]

browse recipe by difficulty

easy

medium

hard

Instagram

[instagram-feed]
follow Nicole

Healthy Eats

Baked-Sweet-Potato-Chips-with-Blue-Cheese-Sauce-and-Bacon-5

Easy

Pan-Roasted Salmon with Garlicky Kale and Citrus Vinaigrette
Baked-Sweet-Potato-Chips-with-Blue-Cheese-Sauce-and-Bacon-5

Medium

Baked Sweet Potato Chips with Blue Cheese Sauce, Bacon and Green Onion
Spicy Pumpkin and Butternut Ramen PS2

Medium

Spicy Thai-Style Pumpkin and Butternut Ramen

Never miss a recipe!

Loading

By Course

Appetizers

Breakfast

Quick and Easy

Main Course

Soups

Salads

Side Dishes

Sweets

Explore

About Nicole

Shop Favorites

Press

Work With Me

Privacy Policy

Accessibility

Contact

© 2023 Cooking for Keeps
Site Credits Designed by Melissa Rose Design Developed by Once Coupled
Back to Top